Shortcuts To Make Your Own Dialogue Driven Animation
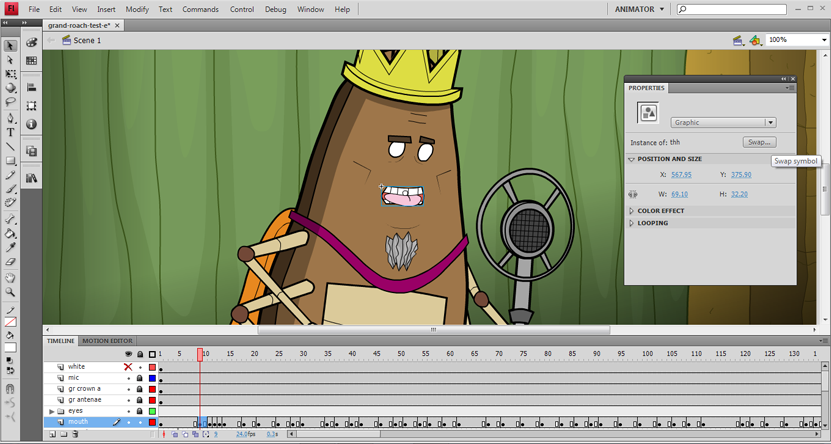
Adding high quality lip sync to your animation can be easy with these techniques.
The hardest part about lip sync in 2d is finding and then setting up the right tools for your film. I worked in with both Flash and After Effects to find the simplest method for me to animate a lot of dialogue. Flash CS4 won out due to the flexibility of the lip syncing tools.
I'd like to show you a couple of images and menus that I'm using to animate my short. These steps will get you set up to animate your own dialogue.
A. Setting Up The Imagery
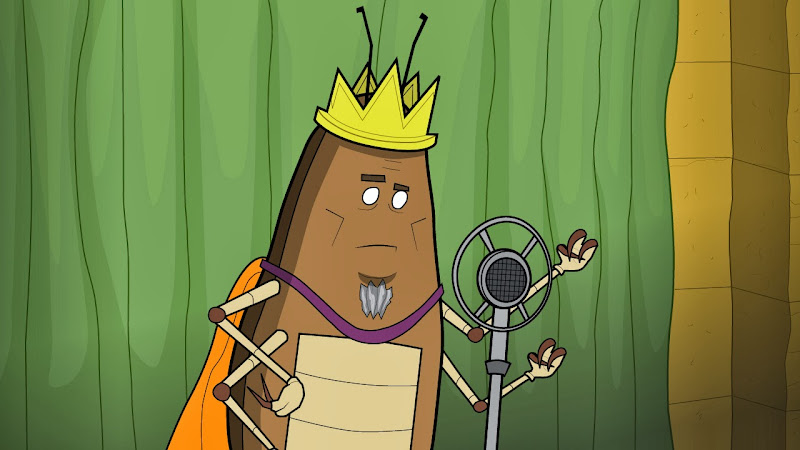
Diagram A-1. The Illustrator file is made up of individual parts on a series of layers.
Using Illustrator, I've created an AI file containing many layers for each part of a character that I want to animate. The most important parts such as eyes, brows and mouths are each on separate layers.
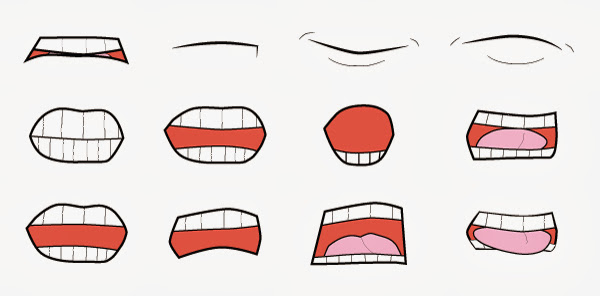
Diagram A-2. Vector mouths are laid out for each type of sound and shape I plan on animating.
Above is a look at an isolated shot of the mouths. These vector mouths will be aligned to one central point in Illustrator before importing them into Flash. This way, they all appear to be opening and closing at the same spot in space. After aligning the mouths, I've saved the entire image as a CS4 AI file so that my copy of Flash CS4 will be able to import as clean vector art.
B. Setting Up The Layers.
We have to take the art made in Illustrator and translate that information to Flash. Since they are both vector programs from Adobe it is very simple - provided you are using the same generation of product. Time to open Flash and find your own Illustrator file.
1. Import your entire image file to the Stage with File > Import To Stage.
2. In this dialogue box, you can see each part and layer of your image. Flash will recognize each layer and the name you have given these layers in Illustrator. Flash will make a layer that corresponds to each one on the Timeline. Make sure nothing is hidden or unchecked that you need and click OK.
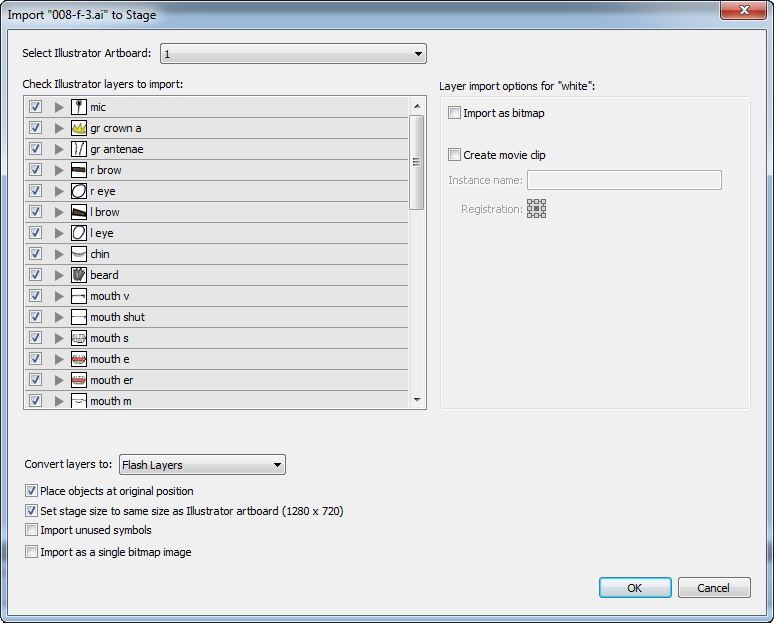
Now we have the whole vector image in Flash on multiple layers to animate. See Diagram B-2 for how this will look.
See the folders in the Timeline? We will get to that. Just make a mental note for now.
Next, we need to combine the most important parts of this drawing and then isolate the parts we need to animate into symbols. These symbols will live in the Library. They will be made and aligned in the spot that they were imported at, on the Stage and the Timeline.
1. Select your background imagery layer and group it. It doesn't need to be a symbol for this demo.
2. After the background is grouped, lock it's layer with the padlock icon in the Timeline.
3. Next, we need to convert the character's various parts, on their individual layers, into Graphic Symbols.
4. First find the multiple mouths layers. Make each mouth into a symbol by selecting Modify > Make Symbol or Ctrl+F8. Make these symbols into Graphics - not Movie Clips. Name each symbol after the sound that they make such as "Oh" or "P" or "B".
5. On the Timeline, delete all mouth layers but one. This layer contains only one mouth Graphic symbol.
6. These mouth symbols now live safely in your Library as a symbol that can be edited any way that you want. I suggest you divide your Library into several sections to organize your art as you make each of your own symbols.
See Diagram B-3 below for how I organize my work in my own Library.
Diagrams B-2 and B-3. B-2 shows the mouth layer highlighted in the layers on the Timeline. B-3 shows the Library sorted into folders that separate important art from miscellaneous components.
7. After making each of the mouth Graphics you need to make symbols for every animated object in the scene.
This is a list of the major symbols used in this clip that live on the Timeline and in the Library. You should set up your own character in a similar way.
a. Body symbol layer.
b. Right and left arms in folders containing symbols for hands, fore arms, and biceps.
c. Right and left eyes and brows symbols in folders on individual layers.
d. Antenna symbol layer.
e. Chin symbol layer.
f. Beard symbol layer.
g. Mouth layer with one mouth symbol on it.
8. Remember your mental note for the folders in B-2? It's time to make new folders in the Timeline to contain the arms and eyes. You should have a left arms folder, right arms folder and an eyes folder (see B-2). Each folder contains the parts that make up each object.
9. Now, in the Library, make folders for each set of parts such as arms, eyes and mouth. Sort these symbols out and into their own respective folders (see B-3). The mouth folder is the most important. Without a mouth folder you will be crying by the end of this demo. See B-3 for Library folders.
Please note that folders in the Timeline and folders inside of the Library are nearly identical. They organize multiple layers in nearly the exact same way. You will need the folders in both panels to keep organized.
The difference between Library and Timeline symbols is that the symbols in the Library are GLOBAL symbols. Anything you do to edit the Library versions will effect every "instance" of that symbol on the Timeline. This is important to understand. We only want to edit on the Timeline for this demo - not the Library.
Now that we have our Timeline layers and Graphic symbols set up - we need to address sound and then start the animation.
C. Set Up To Import/Export Sound
The highest quality of sound needs to be used for the final product. By default, as you begin you are working with Flash's low quality version of audio that isn't previewed on the Timeline. We need to make some changes so that we can "scrub" through the Timeline to note each sound.
1. Create a new layer in the Timeline called "sound".
2. File > Import To Stage and add your WAV or AIF file. Do not use MP3 files. They are not a viable format to make animation with.
3. Select the sound on the Timeline and go to the Properties dialogue box. Under "Sync" change the setting from "Event" to "Stream". See diagram C-1 below.
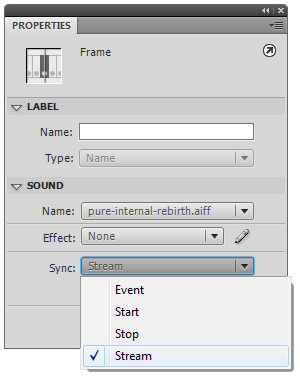
This step will allow Flash to do real-time previews of your voice over or sound effects. When you export it to a movie (Ctrl+Enter) you might hear a clear difference in the audio quality. We don't want this low quality version to be our final product.
We can fix this so that the published movie has better audio automatically without shifting back and forth in the sound files audio properties.
1. Open the Publish settings under File > Publish Settings.
2. Open the Flash tab.
3. Look for the Image and Sounds settings.
4. Notice that, by default, the settings are in MP3, 16kbps and Mono for audio during Events and Streams. Click "Set" for both Event and Stream.
5. Change the settings to MP3, 128kbps and Stereo. Make the quality "Best". See diagram C-2.
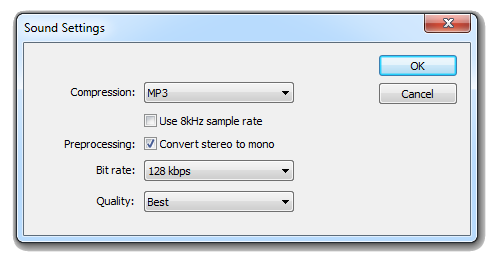
Now you have a preview version in Flash that sounds good and can be worked with. Plus, your final version will sound great too.
D. Setting Up And Animating The Mouth
This is the trickiest part. We need to use the waveform to identify each individual part of the dialogue. Dope or exposure sheets can be helpful in understanding each part of the words. However, you will need to find each second or millisecond these sounds occur if you use dope sheets. The only way I have found to do so is my opening a video editing software, like Premiere, and marking each word down.
This was far too tedious for me to do. I don't suggest you do this either.

The best way to clearly mark dialogue is by building in your own labels in Flash. You will not be able to write in every word. However, you will be able to mark the key points in the dialogue in which your character will be most active. See diagram D-1.
As you can see, I have set my frame rate to 24 fps. I've looked at the waveform and scrubbed to find the four points in the audio track and then marked them. The words in between these keywords will be represented by the rest of the symbols in my Library. But first we need to mark our keywords.
1. Make a new layer in the Timeline above your mouth and audio track layers. Name it "labels".
2. At the first keyword point, frame 55 in this case, right click and select "Make Blank Keyframe". See Diagram D-2.
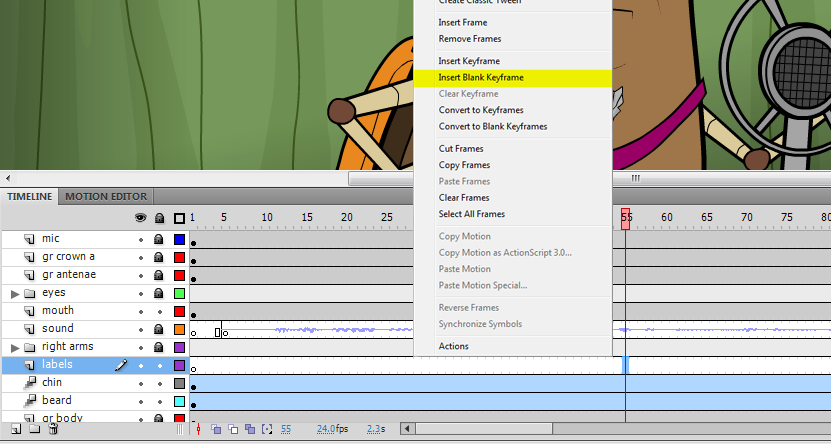
3. With this frame selected, by right clicking, go to the Properties menu. Under "Label" type in the word. In my case "poverty". See Diagram D-3 for these locations. In D-2 you can see where this keyframe is located.
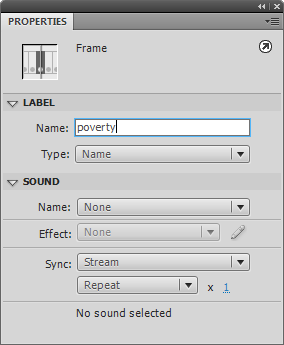
4. Repeat the process of making a Blank Keyframe and naming it for each important word. There should only be a few words you want to have your character emphasize.
Now we are ready to go! You will be surprised at how easy it is now that all the set-up is over.
Time to start replacing the mouth symbol for each syllable. This method is a lot like stop motion animation. Let's start by going to our first keyword "poverty".
1. At the frame marked for the start of the first keyword on the labels layer, right click on the corresponding frame on the mouths layer. In the contextual menu, select "Insert Keyframe". See D-4.
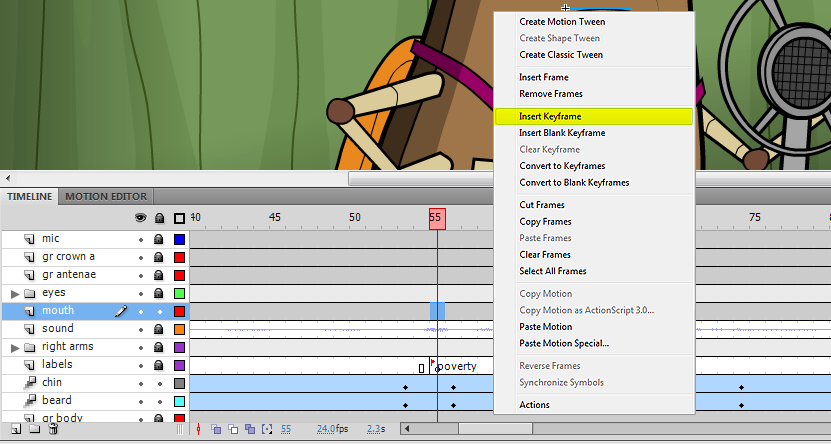
We need the closed mouth preparing to make the "PAH" sound in the word poverty here. This symbol lives in the mouth folder in our Library. We don't want to throw this symbol the Timeline! It will not be aligned correctly. Instead, we will use the Swap Symbol function built into Flash for this task.
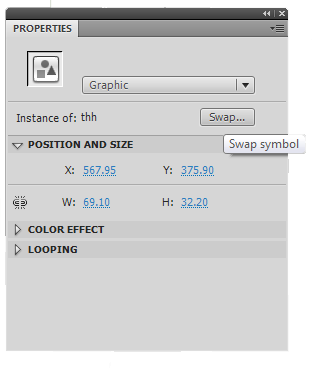
2. On the Stage, select the keyframe you've just made. In the Properties panel, find the Swap button. See D-5 below.
2. The Swap Symbol interface is up and asking us which symbol we want to get. This is a direct reflection of the mouth folder in your Library. Locate your mouths folder and look for the appropriate symbol. Click OK.
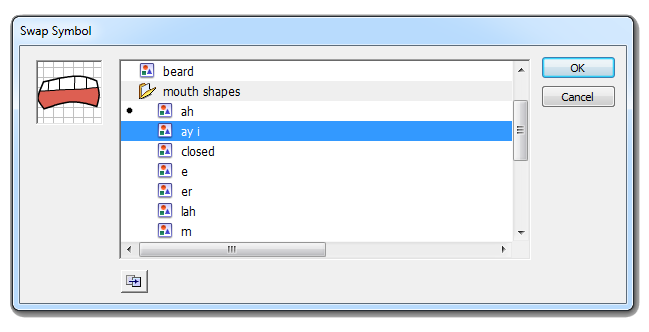
Diagram D-6. The Swap Symbol panel contains all of the mouths in your Library file.
3. The mouth symbol has been replaced by the appropriate symbol for the sound being made.
Now you have started building a keyword from a well-organized Library. The rest of the steps involve finding the right shape in your Library and keyframing it in using Swap Symbol. I've gone ahead and animated the mouth using this technique. I've also added some animation using the Motion Tween and Motion Editor, to be demonstrated later, and came up with this clip.
That's the demo. I hope you kept up with each step. It can be intense but it provides some really efficient results. Please let me know if you have any problems with your own animations while using this these techniques. Thanks for reading.


No comments:
Post a Comment
"Cogito ergo sum irascor." — René Deroaches
Note: Only a member of this blog may post a comment.