New chapters of my indie webcomic Kingdoms are coming up. The renegade King Crudd escapes from justice to find a forest of rhino beetles and kung fu monks. Crudd comes face to face with a legendary monster.
This book is a fantasy adventure with Crudd running from violent insect societies at war. Wardens Of The Golden Forest Webcomic - coming this Fall. Ages 14+ for violence and mild gore.
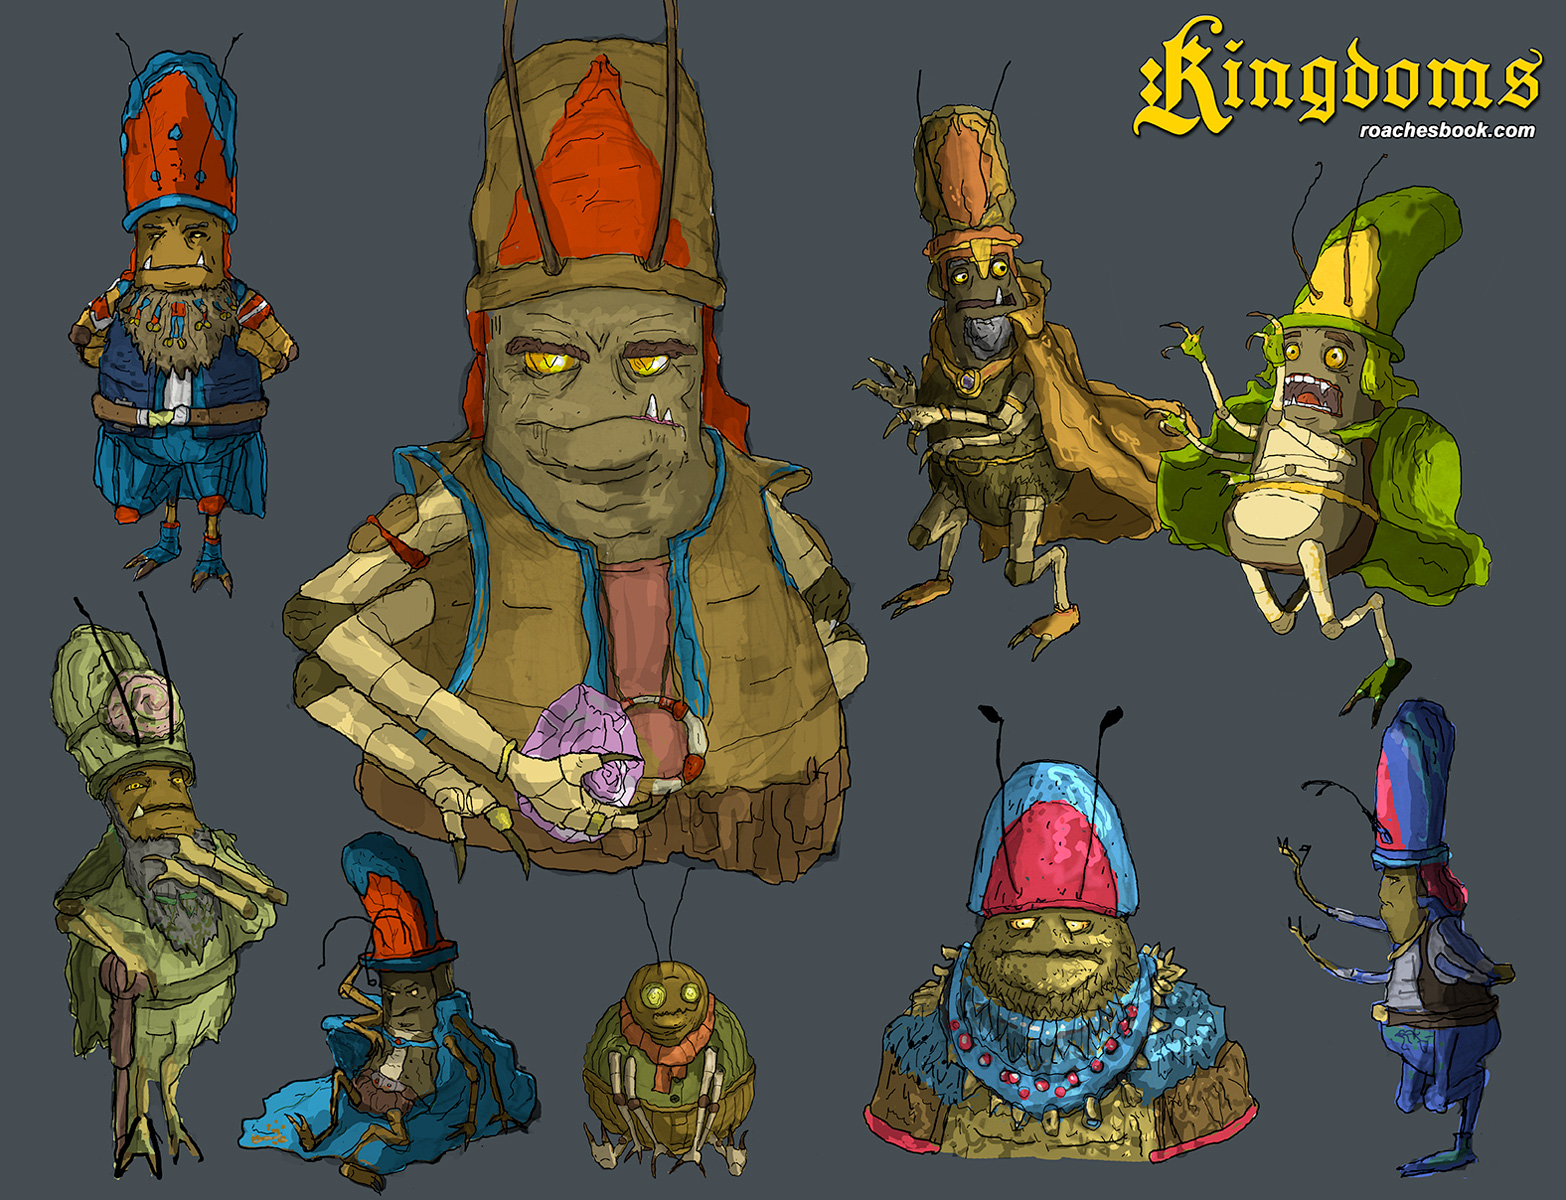
Drawing more natural and hand made looking clothing on these characters to add some sense of realism to them. I like seeing more references to nature in their costumes. There are some forest dwellers with snail shell ornanments or large ogre sized roaches in feather camoflage.
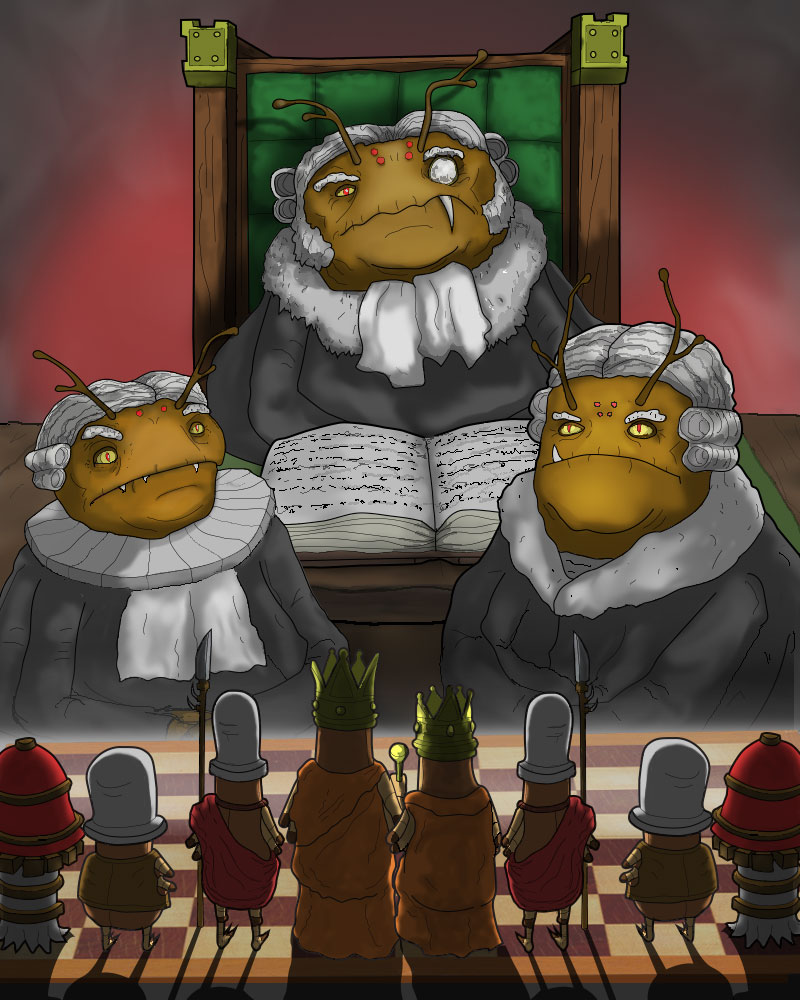
A War Criminal vs. A Terrifying Trio Of Judges Strange Insect Kingdom Justice Is Decided By Deadly Combat
The Tribunal Terrible: Justice Reegen, then Chief Justice Kane and Jr. Justice Sprinkles. Prosecutor Dorenda is at the far right.
The previous comic's look as a vectory, cartoon style was a good basis for the style I am working on for this new book. That first style was directly derived from 60's cartoons from Hanna Barbera. That meant basic designs with a limited art style. This time I am focusing on more attention to the details.
I generally like using cartoony styled characters because it's practical. My art, writing and publishing team is one person. A very stressed out person. With a short temper.
This time out of the gate, I want to be more faithful to the type of action oriented books that I've been reading for 15+ years. These types of books include Kentaro Miura's Berserk, Arakawa's Full Metal Alchemist, the Drifters series, K&K's Lone Wolf and Cub and Stan Sakai's Yosagi Yojimbo.
These books I love for their style and the depth of character. These tales are multifaceted! Now, I am humbly working to make something 1/10th as awe inspiring and emotionally moving as these master artists and writers. Especially Miura and Arakawa who are the biggest influences on what I am up to today.
Above there are four sketches of a small female judge. Right at the top of the concept art piece is Justice Reegen. She is a ball of crazy energy and a hyperactive creature with a background in archery. In dark green robes, at the bottom right is the vicious and self-righteous creature Chief Prosecutor Dorenda.
How will this next leg of this webcomic series go down? Stay tuned, True Believers.
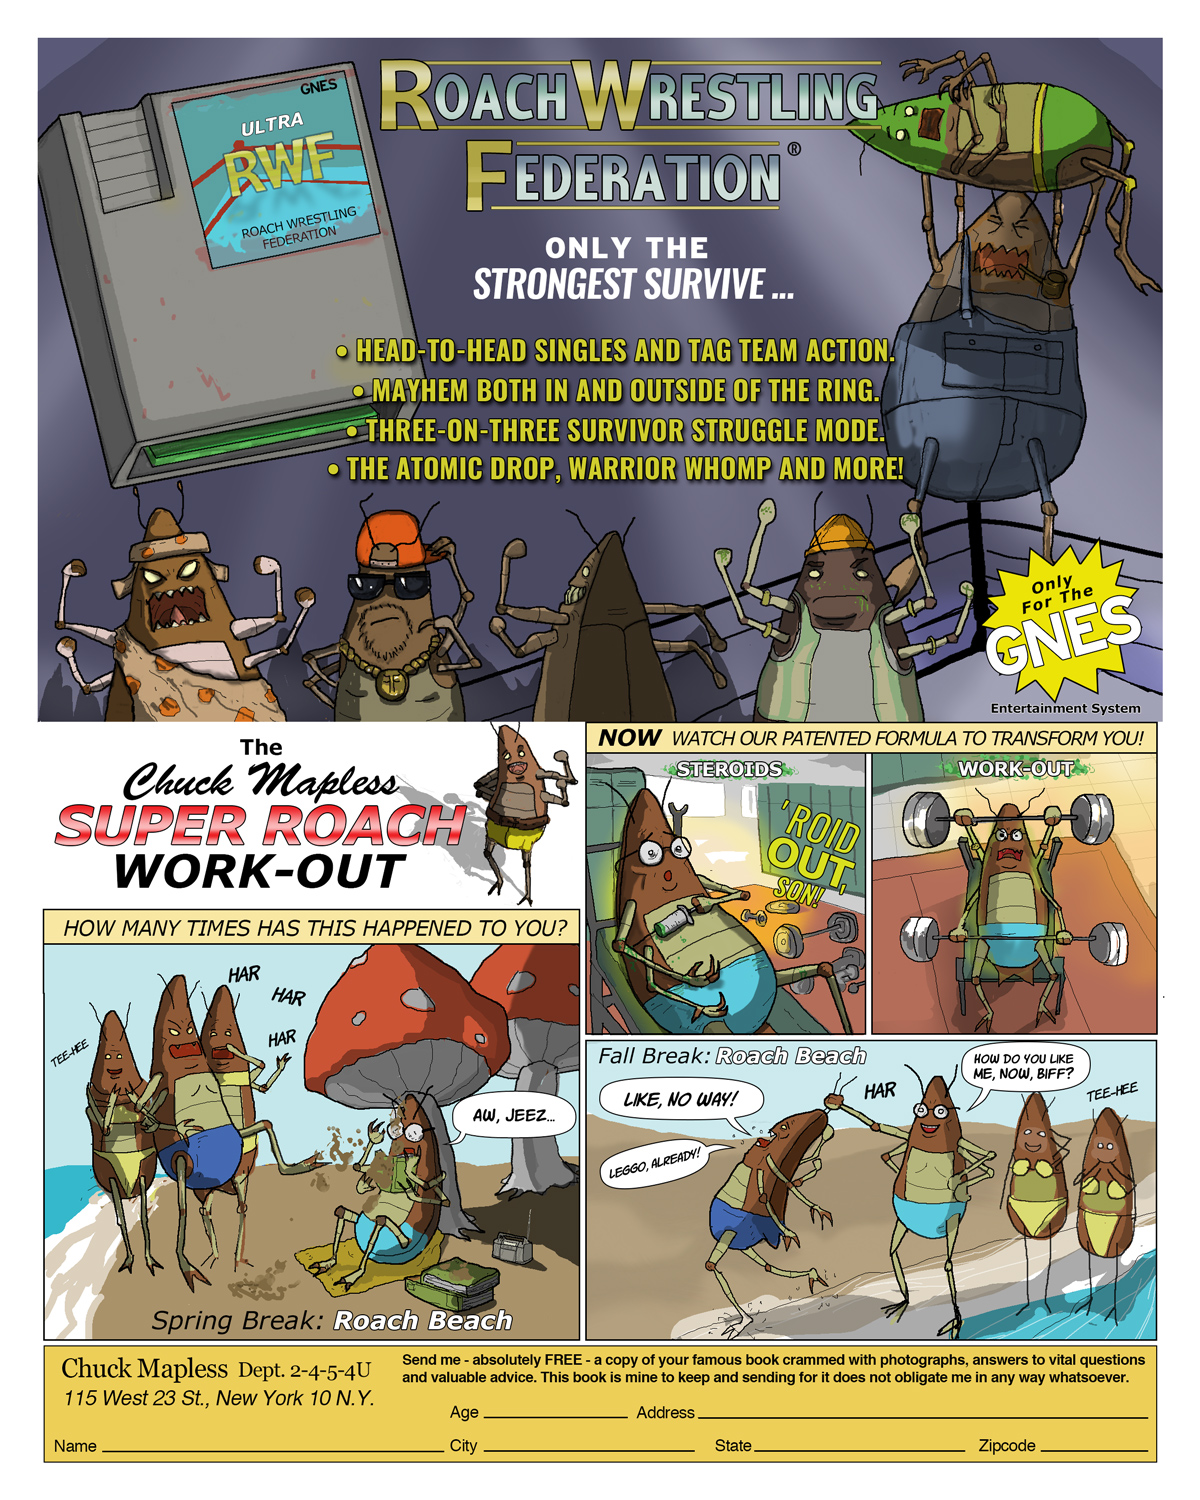
Sea Monkeys, WWF and Charles Atlas Parody Pages DC And Marvel Comic Ads For Rip-Off Products
Ads were everywhere in Marvel and DC comics. I started noticing them in comics from the 1960's X-Men. The X-Ray specs, sea monkies, and strange Hostess ads with the Hulk or Spider-Man were usually badly printed two-toners. Later, there were ads in the 1990's for Nintendo characters and games.
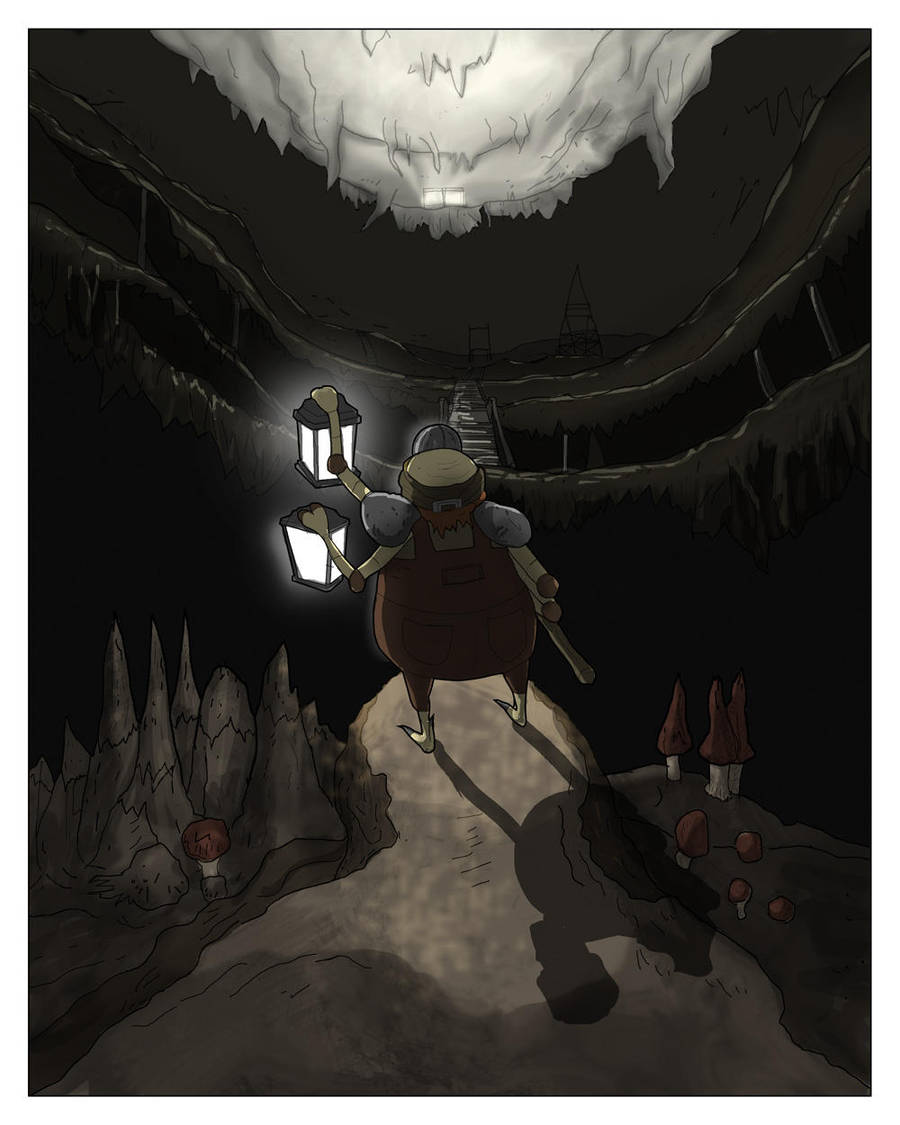
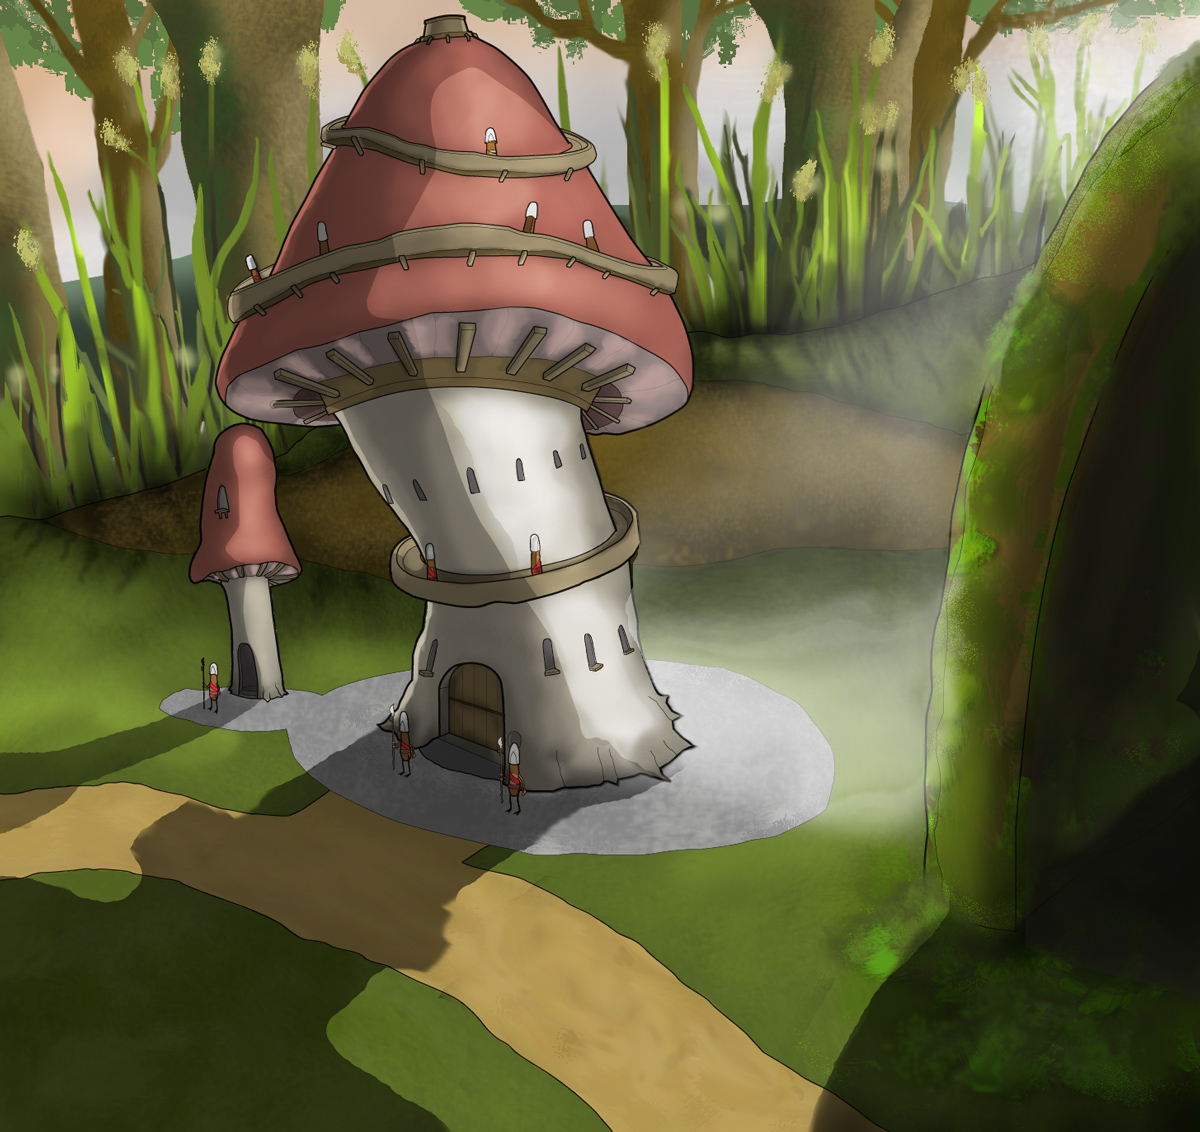
Meet The Cavern Cops What crawls unseen in the dank catacombs beneath the Tower?
These nefarious looking insects are milkweed beetles. They are diligent, militant and very aggressive to trespassers. These creatures act as fearsome guardians in the underground tunnels beneath the Tower. They owe their loyalty to Justice Reegen.
Their real life counterparts belong to the genus Tetraopes, a Latin classification meaning "four-eyes".
New Surreal Fantasy Webcomic Warring factions in the insect kingdoms fight for a valuable prize.
Kingdoms is an adventure webcomic with cartoony charters. The wars and battles contain insect blood, gore and violence. Kingdoms takes the lead character from the first book, The Grand Roach, and sets up a story with him as King and the leader of a belligerent roach army. I am planning on releasing the first two chapters. Then, I'll release the third chapter pages weekly.
The new idea for this story got itself together on a giant drafting table in my first studio space that I set up here when I got back into Indiana.
The first chapters feature medieval warfare with arrows, bows, spears... I've currently finishing the webcomic pages in Photoshop using an extended version. It has better brushes to digitally ink and color than Illustrator could do in a timely manner.
Let me know if you like the bug guts or if the action scenes are too much, or perfect, or what.
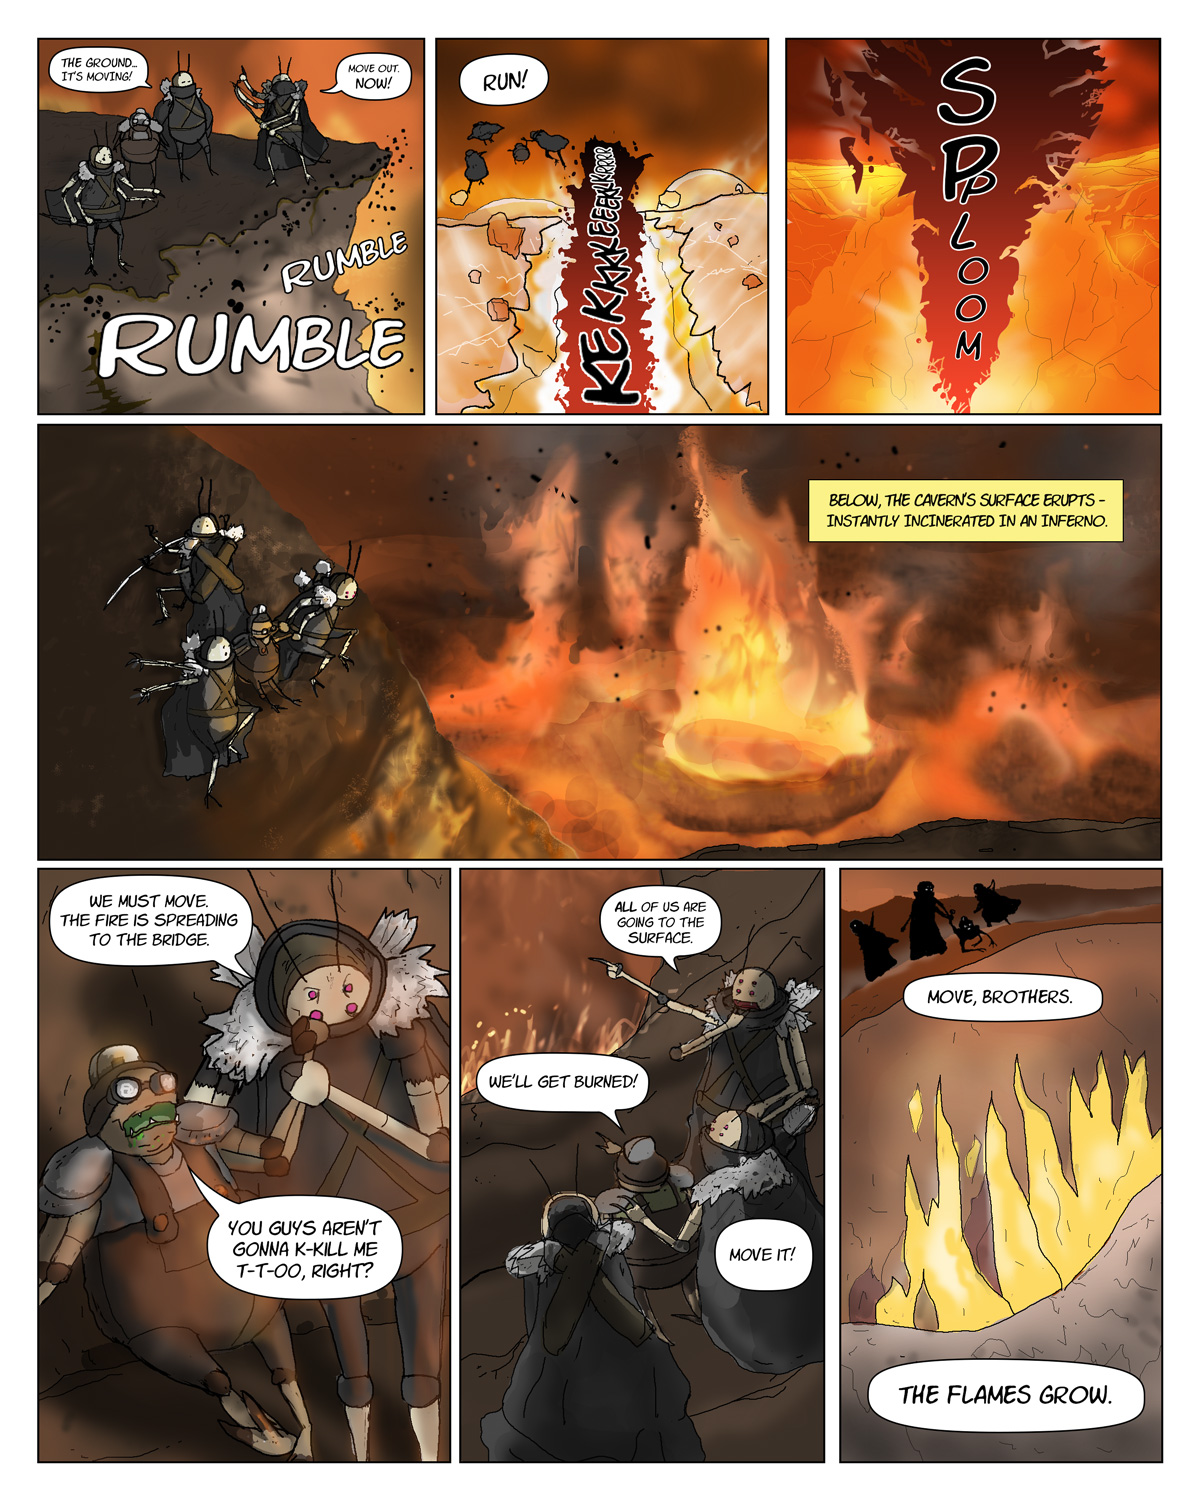
Expanding Story And Terrain Chapter Two is a deep tale set underground.
Some of the current art from the pages that I've scanned and begun cleaning up. While the line art part is flying - the color and lighting for an underground setting is challenging to make.
Chapter Two skips from the tower and Grand Roach's trial to an underground subterranean area. Check out the early line and tone artwork right here.
What if an RTS Fought a Webcomic? Indie web comic series characters star in video game warfare.
This art started out an artist reference map for the next book. Then, I decided to use it as a gate fold spread in the comic. The angle suggested that I could do a little more with it. So I ended up editing it together as a web-based game.
If it was a straight up game it would play like Company Of Heroes II. I liked that particular camera angle for exploration. The map details in COH2 are also really outstanding. If I had the coding talent for a short real-time-strategy PvP it would look like this. Each player would be choosing a defensive or offensive faction within the forest map.
Satire Gets An Upgrade In New Volume Webcomic Veers Into Fantasy Direction The Exuvian villagers have a very different culture from the roaches we've seen before.
The story for the next book is a new direction for a series that began as a humble black-and-white webcomic. Instead of the gag/page-a-week format I've moved into a fantasy approach for the art and a more traditional approach to story. This arc turns the Roach kingdom upside down. It reveals intrigues and introduces fascinating new characters.
This book has been penciled. I'm in the process of cleaning it up and digitally inking now. Colors for the book seem to need more attention. The flat and slightly shaded style used in book one is now a thing of the past. The early results for book two look very good.
New production art from the new book promises more edgy adventures in the Insect Kingdom.
New types of roaches and insects are coming up in the next book. I really wish I could say more! Subscribe to this site for upcoming announcements.
Growing Cast Threatens Sleep Patterns Man Battles Insomnia For The Love Of Webcomics Roll-Over Mouse Cursor, Click or Tap Cards
Click on a card above to see the front and back views of these comic cards.
The thing about roaches is that they are next to impossible to kill.
My recent work in other areas (Graphic/Web Design) and other titles (Puppets/War Cry) has kept me really busy. The techniques developed from working on other projects are getting applied to my first title, Roaches.
For example, it's not a problem to design a template for comic cards and then render the art. That was not exactly the case when the webcomic got started back in star date 20XX. Then, as a mild mannered web designer by day, it was strictly HTML - which is kind of a code related joke and comic artist by night.
Now, I can see some of the carefully honed elements from the books that I love (GoT/Mouse Guard) as they start showing up, gradually, in this title. For me to take a "one-off" webcomic and push it towards a fully rendered card set is an important milestone over here, already.
If you aren't subscribed to this blog and buying the books - you are making a huge mistake. Luckily you can make up for it. Buy some merch. Help an artist to continue making one-of-a-kind work.
Tricks, Tips And Techniques Shortcuts To Make Your Own Dialogue Driven Animation Adding high quality lip sync to your animation can be easy with these techniques.
The hardest part about lip sync in 2d is finding and then setting up the right tools for your film. I worked in with both Flash and After Effects to find the simplest method for me to animate a lot of dialogue. Flash CS4 won out due to the flexibility of the lip syncing tools.
I'd like to show you a couple of images and menus that I'm using to animate my short. These steps will get you set up to animate your own dialogue.
A. Setting Up The Imagery Diagram A-1. The Illustrator file is made up of individual parts on a series of layers.
Using Illustrator, I've created an AI file containing many layers for each part of a character that I want to animate. The most important parts such as eyes, brows and mouths are each on separate layers.
Diagram A-2. Vector mouths are laid out for each type of sound and shape I plan on animating.
Above is a look at an isolated shot of the mouths. These vector mouths will be aligned to one central point in Illustrator before importing them into Flash. This way, they all appear to be opening and closing at the same spot in space. After aligning the mouths, I've saved the entire image as a CS4 AI file so that my copy of Flash CS4 will be able to import as clean vector art.
B. Setting Up The Layers.
We have to take the art made in Illustrator and translate that information to Flash. Since they are both vector programs from Adobe it is very simple - provided you are using the same generation of product. Time to open Flash and find your own Illustrator file.
1. Import your entire image file to the Stage with File > Import To Stage.
2. In this dialogue box, you can see each part and layer of your image. Flash will recognize each layer and the name you have given these layers in Illustrator. Flash will make a layer that corresponds to each one on the Timeline. Make sure nothing is hidden or unchecked that you need and click OK.
Diagram B-1. Flash's Import settings interpret every shape as either a layer, group or shape.
Now we have the whole vector image in Flash on multiple layers to animate. See Diagram B-2 for how this will look.
See the folders in the Timeline? We will get to that. Just make a mental note for now.
Next, we need to combine the most important parts of this drawing and then isolate the parts we need to animate into symbols. These symbols will live in the Library. They will be made and aligned in the spot that they were imported at, on the Stage and the Timeline.
1. Select your background imagery layer and group it. It doesn't need to be a symbol for this demo.
2. After the background is grouped, lock it's layer with the padlock icon in the Timeline.
3. Next, we need to convert the character's various parts, on their individual layers, into Graphic Symbols.
4. First find the multiple mouths layers. Make each mouth into a symbol by selecting Modify > Make Symbol or Ctrl+F8. Make these symbols into Graphics - not Movie Clips. Name each symbol after the sound that they make such as "Oh" or "P" or "B".
5. On the Timeline, delete all mouth layers but one. This layer contains only one mouth Graphic symbol.
6. These mouth symbols now live safely in your Library as a symbol that can be edited any way that you want. I suggest you divide your Library into several sections to organize your art as you make each of your own symbols.
See Diagram B-3 below for how I organize my work in my own Library.
Diagrams B-2 and B-3. B-2 shows the mouth layer highlighted in the layers on the Timeline. B-3 shows the Library sorted into folders that separate important art from miscellaneous components.
7. After making each of the mouth Graphics you need to make symbols for every animated object in the scene.
This is a list of the major symbols used in this clip that live on the Timeline and in the Library. You should set up your own character in a similar way.
a. Body symbol layer.
b. Right and left arms in folders containing symbols for hands, fore arms, and biceps.
c. Right and left eyes and brows symbols in folders on individual layers.
d. Antenna symbol layer.
e. Chin symbol layer.
f. Beard symbol layer.
g. Mouth layer with one mouth symbol on it.
8. Remember your mental note for the folders in B-2? It's time to make new folders in the Timeline to contain the arms and eyes. You should have a left arms folder, right arms folder and an eyes folder (see B-2). Each folder contains the parts that make up each object.
9. Now, in the Library, make folders for each set of parts such as arms, eyes and mouth. Sort these symbols out and into their own respective folders (see B-3). The mouth folder is the most important. Without a mouth folder you will be crying by the end of this demo. See B-3 for Library folders.
Please note that folders in the Timeline and folders inside of the Library are nearly identical. They organize multiple layers in nearly the exact same way. You will need the folders in both panels to keep organized.
The difference between Library and Timeline symbols is that the symbols in the Library are GLOBAL symbols. Anything you do to edit the Library versions will effect every "instance" of that symbol on the Timeline. This is important to understand. We only want to edit on the Timeline for this demo - not the Library.
Now that we have our Timeline layers and Graphic symbols set up - we need to address sound and then start the animation.
C. Set Up To Import/Export Sound
The highest quality of sound needs to be used for the final product. By default, as you begin you are working with Flash's low quality version of audio that isn't previewed on the Timeline. We need to make some changes so that we can "scrub" through the Timeline to note each sound.
1. Create a new layer in the Timeline called "sound".
2. File > Import To Stage and add your WAV or AIF file. Do not use MP3 files. They are not a viable format to make animation with.
3. Select the sound on the Timeline and go to the Properties dialogue box. Under "Sync" change the setting from "Event" to "Stream". See diagram C-1 below.
Diagram C-1. The sound's ability to be previewed can be changed in the Properties panel.
This step will allow Flash to do real-time previews of your voice over or sound effects. When you export it to a movie (Ctrl+Enter) you might hear a clear difference in the audio quality. We don't want this low quality version to be our final product.
We can fix this so that the published movie has better audio automatically without shifting back and forth in the sound files audio properties.
1. Open the Publish settings under File > Publish Settings.
2. Open the Flash tab.
3. Look for the Image and Sounds settings.
4. Notice that, by default, the settings are in MP3, 16kbps and Mono for audio during Events and Streams. Click "Set" for both Event and Stream.
5. Change the settings to MP3, 128kbps and Stereo. Make the quality "Best". See diagram C-2.
Diagram C-2. The sound quality in Flash can be changed in the Publish Settings panel.
Now you have a preview version in Flash that sounds good and can be worked with. Plus, your final version will sound great too.
D. Setting Up And Animating The Mouth
This is the trickiest part. We need to use the waveform to identify each individual part of the dialogue. Dope or exposure sheets can be helpful in understanding each part of the words. However, you will need to find each second or millisecond these sounds occur if you use dope sheets. The only way I have found to do so is my opening a video editing software, like Premiere, and marking each word down.
This was far too tedious for me to do. I don't suggest you do this either.
Diagram D-1. Save time by noting the keywords inside of the Timeline.
The best way to clearly mark dialogue is by building in your own labels in Flash. You will not be able to write in every word. However, you will be able to mark the key points in the dialogue in which your character will be most active. See diagram D-1.
As you can see, I have set my frame rate to 24 fps. I've looked at the waveform and scrubbed to find the four points in the audio track and then marked them. The words in between these keywords will be represented by the rest of the symbols in my Library. But first we need to mark our keywords.
1. Make a new layer in the Timeline above your mouth and audio track layers. Name it "labels".
2. At the first keyword point, frame 55 in this case, right click and select "Make Blank Keyframe". See Diagram D-2.
Diagram D-2. At the time that the first keyword appears we want to set a blank keyframe and then label it.
3. With this frame selected, by right clicking, go to the Properties menu. Under "Label" type in the word. In my case "poverty". See Diagram D-3 for these locations. In D-2 you can see where this keyframe is located.
Diagram D-3. In the Properties panel, we name the first keyword in the labels layer.
4. Repeat the process of making a Blank Keyframe and naming it for each important word. There should only be a few words you want to have your character emphasize.
Now we are ready to go! You will be surprised at how easy it is now that all the set-up is over.
Time to start replacing the mouth symbol for each syllable. This method is a lot like stop motion animation. Let's start by going to our first keyword "poverty".
1. At the frame marked for the start of the first keyword on the labels layer, right click on the corresponding frame on the mouths layer. In the contextual menu, select "Insert Keyframe". See D-4.
Diagram D-4. At the time that the first keyword appears we want to set the first mouth keyframe.
We need the closed mouth preparing to make the "PAH" sound in the word poverty here. This symbol lives in the mouth folder in our Library. We don't want to throw this symbol the Timeline! It will not be aligned correctly. Instead, we will use the Swap Symbol function built into Flash for this task.
2. On the Stage, select the keyframe you've just made. In the Properties panel, find the Swap button. See D-5 below.
Diagram D-5. The Properties panel contains the Swap button. Use it to replace the mouths in your animation.
2. The Swap Symbol interface is up and asking us which symbol we want to get. This is a direct reflection of the mouth folder in your Library. Locate your mouths folder and look for the appropriate symbol. Click OK.
Diagram D-6. The Swap Symbol panel contains all of the mouths in your Library file.
3. The mouth symbol has been replaced by the appropriate symbol for the sound being made.
Now you have started building a keyword from a well-organized Library. The rest of the steps involve finding the right shape in your Library and keyframing it in using Swap Symbol. I've gone ahead and animated the mouth using this technique. I've also added some animation using the Motion Tween and Motion Editor, to be demonstrated later, and came up with this clip.
That's the demo. I hope you kept up with each step. It can be intense but it provides some really efficient results. Please let me know if you have any problems with your own animations while using this these techniques. Thanks for reading.
Roach War - What Is It Good For? Microscopic Melodrama Marches Into Production
During of the worst of the new year's harsh quasi-blizzard weather I’ve been working on an animated short for Roaches. This first pilot episode is titled “If War Were Declared”. It's set in a WWI era world in the roach city of Kor.
"If War Were Declared" stars Canadian actor Julian Mulock as the Grand Roach. Assistant Director and Sound Engineer Tim Thomson. Written, designed and directed by me, Paul Schmitt.
I’m looking for 2D Character Animators to help finish this short. Send me an email if you're interesting in volunteering your time to help with this indie animation.
The sound track for this short is made up of WWI era songs. I'm continually researching the period around WWI in America and England for this short. I found this tune in the Library of Congress's collection. It was recorded in Camden, New Jersey in 1917 by the American Quartet and is titled "It's a long way to Berlin, but we'll get there!".
At Deviant Art a few of my friends have added some important input for the overall art direction. Now it looks like that these bugs could be driving 1914 era VW Bugs. It's an example of how fans and other creators can give you something really valuable to you if you just ask for it. Good stuff.
21st Century Opera Is Sung With Bodyslams "Whatcha gonna you do when Roachamania comes for you, brother?!?"
In the squared circle, an insect is tested by all forces. Strength and determination are the only weapons he can wield. He stands alone in a darkened world of foes inside of a faceless arena that howls for his blood. Will this brave bug stand or will he fall?
Rock 'n Roll Roach Versus Disco Roach Why and How 1's And 2's Can't Deal With 3's And 4's
As soon as the turntables and the Cold Play hits your favorite rock 'n roll club - duck for cover. Things are about to take a sudden left turn.
Bars and clubs grow to a point where they book great regional and national acts that draw quality crowds. Alt-rock/punk/rock-a-billy road warriors drive in from all over the country to rock the house. A club at it's peak is something to experience.
Then, all of the sudden, that stops. The next thing you know: one guy is spinning records, terrible dance pop records that pose the existential question: "Do you believe in life after love?" On Friday and Saturday night. At the same club. The one that had all the good rock bands for years...
So, what happened to your rock club? Instead of talking with a wide range of people from all over the country you end up with a identical crowd of the drunk Cher lovin', Madonna boogeyin' yuppie tool bags from the "right" side of town packed in 300 deep. 220 of them have their phones out at all times like Star Trek tricorders being used to carefully navigate a class M planet.
Your favorite rock club is now a very large phone booth (remember them?) that is playing bland Muzak. Just like that.
A Small Bug From The Burbs Makes A Big Splash How He Was Squashed For Your Sins And Why
A 24 Hour Comic gone horribly wrong. Made in Speedway, Indiana outside east of Indianapolis, Indiana.
To make matters worse: this crazy poster idea will end here. Be glad that I didn't post any more of the crucified roach sketches at the bottom right side.
Social Studies In Roach Culture Why Can't These Bugs Seem To Get It Together?
When is this title not about biting perspective on cultural elitism? It works out that way a lot. Even when America is moving from a 1st world country towards a 3rd world country we still cling to our notions of superiority!
And us poor "hipster" bastards are aware of it. The only times we seem to get above the drag towards ruin that the country is clearly caught up in, in any obvious way, is in one or two places where we don't feel like a sweatier version of Quasimodo! These places are almost always bars and coffee shops.
Upcoming Guest Strip At Social Vermyn Featuring all original webcomic characters in a title cross-over.
Here is my guest comic page with the Roaches happily spoiling Victor Vermyn's lunch break. It that will be appearing at John Hageman's Social Vermyn.com webcomic this week, the week of June 28th.
More Roaches pages are heatedly underway for the full-color digital edition of the Roaches book available this Fall. Please subscribe and follow to keep these pages coming!
Webcomic Headed Into Second Edition Full-color pages, handwriting fonts added to build on the style of first book.
This new page concerns dead roaches and why they always end up belly up. Why is that? Does gravity effect cockroaches differently than it does people?
Please continue to subscribe to this comic with Blogger and Feedburner for more pages and looks ahead at the cartoon. As long as you kind folks are viewing and subscribing - I will be keep updating this blog with preview pages for the next edition of the Roaches title and more.
Copy code to add Puppets to your site:
Copy code to add Roaches to your site:
Puppets, Roaches: A Graphic Novel, Cement and The Grand Roach are all registered trademarks of Gargantuan Media. All rights reserved 2010.


